|
|
|
CB400F QuickTurn Throttlekit
Parts and installation instructions
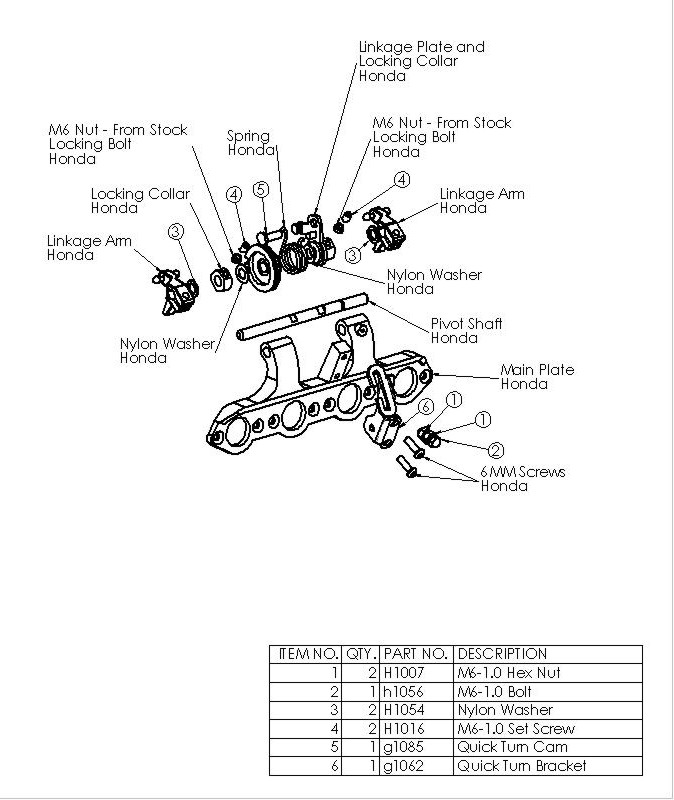
Refer to exploded assembly drawing for parts identification
- Lay the parts out on a clean working surface. Check parts in kit to the parts list to ensure no parts are missing.
- Disassemble the carburetor assembly using a workshop manual for this model.
- Once all of the parts have been stripped off, you will be left with the main plate sub-assembly. Further disassembly requires that the steel pin securing the main shaft to the plate be drilled out.
- Carefully locate and center punch the steel pin.
- Using a drill press, and a sharp 3/32 drill bit, drill out the head of pin approximately 1/16 deep. Switch to a 1/16 bit, and carefully drill down the pin. You will feel the bit go thru the pin at the bottom. Drill very slowly and be sure the main plate is held in place securely. Any movement will cause the bit to break, or drill off center. Once thru, change back to the 3/32 bit and redrill the hole. The remainder of the pin should come out with the drill bit. (If it doesnt, you may have to redrill the hole again with a 1/8 bit) DO NOT ATTEMPT TO DRILL OUT THE PIN WITHOUT A DRILL PRESS
- You can now loosen the bolts on both collars, and slide the collar and stock throttle cam off the shaft.
- Slide the new throttle cam (Item 5) on to the shaft in reverse order, replace the bolts on the collars with the provided setscrews (Item 4), and reassemble the shaft into the main plate.
- Slide one of the 3/8 x 1/16 nylon washers (Item 3) provided onto the ends of the shaft before re-installing the actuator arms.
- Install the new throttle cable receiver bracket (Item 6).
- Reassemble the carburetor assembly as per your shop manual.
- Once everything is back together, you can adjust the throttle stop. Slacken the adjusting bolt (Item 2) and back it out until the throttle rotates open all the way. The limiting factor here is the slide assembly hitting the underside of the cap on top of the carburetor. If you look into the mouth of the carb as you are opening the throttle, you will see the slide clear the bore of the carb, then continue to rise for 2 or 3 mm before the slide hits the cap. Adjust the stop bolt to stop the slide approx. midway between where it clears the bore, and hits the cap.
DISCLAIMER OF WARRANTY - FOR OFF ROAD USE ONLY
THE PURCHASER IS RESPONSIBLE FOR DETERMINING THE SUITABILITY OF ANY AND ALL PRODUCTS PURCHASED.
All denoonsp parts are sold as is without any warranty of any kind. All implied warranties, including all warranties of merchantability of fitness for a particular purpose are excluded.
Purchaser acknowledges that vehicles equipped with these parts must not be operated on public highways since such operation may be unlawful. These performance parts are intended solely for use on vehicles participating in off highway competitive events.
Purchaser understands and recognizes that off road and racing equipment and services provided by manufactured and/or sold by Distributor are subject to varied conditions due to the manner in which they are to be installed and used. Purchaser further recognizes and agrees that suitability of any part sold or manufactured for a particular application is the purchasers decision and that the purchaser is not relying on the skill or judgment of manufactured and/or Distributor regarding suitability of any product or service.
Manufacturer and Distributor make no warranties whatsoever, expressed or implied, oral or written to purchasers with regard to off road and racing equipment. The right to make changes in design or add to or improve on product without incurring any obligations to install the same on products previously manufactured is expressly reserved.
Buyer agrees to indemnity and hold seller harmless from any claim, action or demand arising out of or incident to the buyers installation or use of products purchased from Manufacturer and/or Distributor.
WARNING: Installation of any component or kit should only be performed by persons experienced in the installation and proper operating of vehicle systems.
| | | |